MrsGerrard<33 |
|
| Making a puzzle piece
tutorial made by me (grace)
- - - - - - - - - -
[Only do step one if you haven’t loaded the shapes onto photoshop if you already have, go straight on to step 2]
1. go edit > present manager.. > customer shapes [pic] > load > all [pic] > load
2. then open your image into photoshop
file > open > select image > open
3. Go over to your layers window & double click on where it says ''background''
Then click ''ok'' on the new window that pops up.
4. right click the rectangle tool and then select the custom shape tool [pic]
5. click the arrow to reveal all the custom photoshop shapes. [pic]
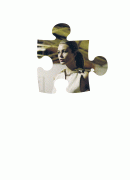
8. scroll through all your custom shapes and select one of the puzzle shapes
[pic]
7. once you’ve selected a puzzle shape draw over the part of your image you want in the puzzle piece
[pic]
8. your layers window will look something like this
[pic]
Double click on where it says ‘background’ and press ok.
9. next you need to add a layer mask to your shape layer.
At the bottom on the layers window there is a rectangle with a square in it, click that, making sure you are on the shape layer.
[pic]
10. hold down ctrl and hover over the new rectangle with a white puzzle piece in it, in the layers window.
[pic]
a square with a dotted border should appear over your mouse curser.
Once this appears just press the rectangle still holding down ctrl
Your puzzle piece should now have a moving dashed border.
[pic]
11. then click onto your picture layer in the layers window, should be called layer 0.
Then go select > inverse.
And press delete on your keyboard.
All that should remain is your colour puzzle shape.
[pic]
12. press ctrl + d
13. then in the layers window next to each layer there is an eye.
Unclick the eye next to the shape layer
[pic]
14. your coloured shape should have disappeared and all your left with is your image in a puzzle piece
Grace’s tut :’) Edited by -grace- - 9/4/2010, 19:58 |
| | |


 I'll try it later and tell you how i did LOL
 xx
xx + came up with this: